Simple CV in Racket
Written by Dominik Joe Pantůček on 2019-02-28
racketAfter a few weeks with OpenCV, we had to admit, that there are certain drawbacks to its usage for our purpose. Different default versions on different platforms, troubles with memory leaks and the need to convert between incompatible image formats. Read on to see what solution we used for addressing these issues.
It is true that OpenCV[1] is a great library for computer vision (CV) algorithms. It is also true, that accessing its internals directly via foreign function interface[2] (FFI) can be error-prone. This was one set of reasons why we needed to look for a different solution.
And with Racket[3] as our primary development platform we decided to implement the simple CV algorithms we needed natively in it. Also we wanted to ensure that we can use the same set of algorithms for both main scenarios: testing the bare PCB and testing the finished product.
Racket provides a really nice interface for working with bitmaps[4]. The only drawback is that there is no function to access individual image pixels by default. Therefore we implemented a very simple approach to read the raw RGB data. We call the solution a "bitmap accessor" and does exactly what you would expect it to do. You create the accessor function from given image and then when you ask this function for RGB data at given coordinates, it returns them.
(define (bitmap-accessor bitmap)
(define width (send bitmap get-width))
(define height (send bitmap get-height))
(define bitmap-bytes (make-bytes (* width height 4)))
(send bitmap get-argb-pixels 0 0 width height bitmap-bytes)
(λ (xx yy)
(define x (inexact->exact (round xx)))
(define y (inexact->exact (round yy)))
(cond ((or (< x 0)
(< y 0)
(>= x width)
(>= y height))
'(0 0 0))
(else
(define off (* 4 (+ (* y width) x)))
(define r (bytes-ref bitmap-bytes (+ off 1)))
(define g (bytes-ref bitmap-bytes (+ off 2)))
(define b (bytes-ref bitmap-bytes (+ off 3)))
(list r g b)))))
Next thing we need to do is to calculate the weight of each RGB triplet. We opted to use the square of euclidean distance:
(define (value2 r g b)
  (+ (* r r) (* g g) (* b b)))
Now, for actually finding the spot where the LED is shining, we compute the weighted average of positions of pixels for which the weight function is higher than :
(define (find-spot-light bmp
                         #:treshold (treshold 128)
                         #:area (area null))
  (define bmpa (bitmap-accessor bmp))
  (define width (send bmp get-width))
  (define height (send bmp get-height))
  (define-values
    (xoff yoff swidth sheight)
    (if (null? area)
        (values 0 0 width height)
        (apply values area)))
  (define th (value2 treshold treshold treshold))
  (define-values
    (tw tx ty)
    (for*/fold
        ((aw 0)
         (ax 0)
         (ay 0))
        ((yy sheight)
         (xx swidth))
      (define x (+ xx xoff))
      (define y (+ yy yoff))
      (define rgb (bmpa x y))
      (define w (apply value2 rgb))
      (if (> w th)
          (values (+ aw w) (+ ax (* w x)) (+ ay (* w y)))
          (values aw ax ay))
      ))
  (list
   (exact->inexact (/ tx tw))
   (exact->inexact (/ ty tw))))
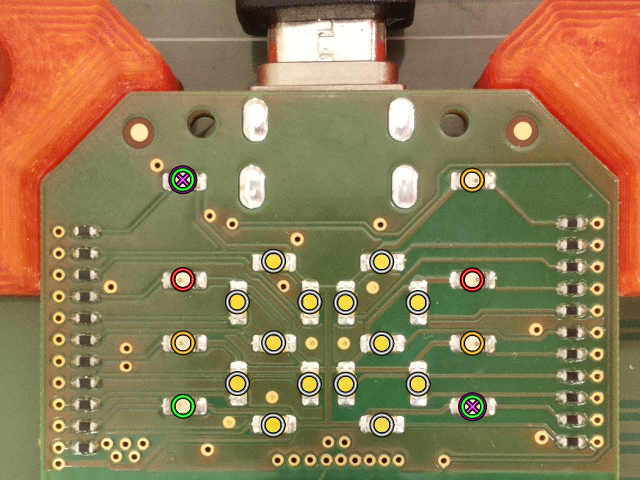
As you can see, you can fine-tune the algorithm by setting different threshold and by restricting the area where to look for the spot light. Using the algorithm for point transformation[5] you can easily find the exact positions of all LEDs if you know the position of two of them like in Picture 1 below.

Picture 1: The simple algorithm finds the LED positions on the PCB with high precision. So the whole CV process goes as follows. We light the top left LED and find its location, then we find the bottom right one and from these two we calculate the affine transformation[6] and get the exact positions from our schema.
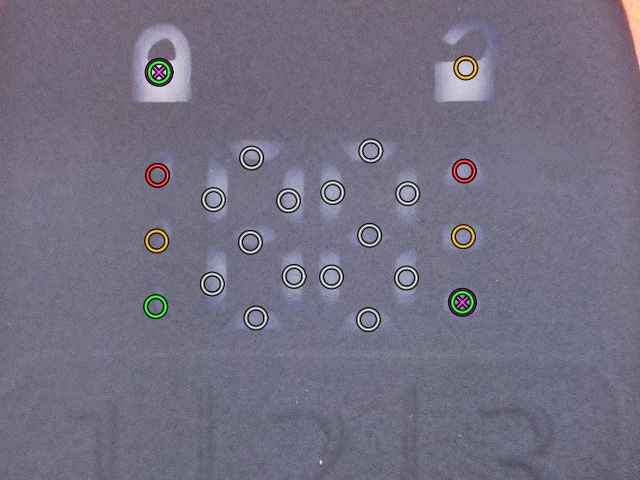
For doing the same with Cryptoucan™ that has already been cast into epoxy we need to fine-tune the area. We do this by running the algorithm twice. First run finds the approximate location and the second run looks in the vicinity of this approximation and finds the exact location. This is needed because the higher reflectivity for red, green and blue components skews the naive results slightly.

Picture 2: The advanced algorithm finds the LEDs positions even if the PCB is already 2mm deep in epoxy. As you can see in Picture 2 above, the resulting positions match the visible parts of our light guide. And of course, all this information goes to manufacturing report of every Cryptoucan™ manufactured!
Hope you liked another look under the hood of our development process and see you next week with something new!
References
-
Wikipedia contributors. (2019, February 12). Foreign function interface. In Wikipedia, The Free Encyclopedia. Retrieved 20:42, February 27, 2019, from https://en.wikipedia.org/w/index.php?title=Foreign_function_interface&oldid=882965435
-
https://trustica.cz/en/2018/12/06/cryptoucan-pcb-visual-control/
-
Wikipedia contributors. (2019, February 26). Affine transformation. In Wikipedia, The Free Encyclopedia. Retrieved 20:44, February 27, 2019, from https://en.wikipedia.org/w/index.php?title=Affine_transformation&oldid=885138324
